
Sometimes the real turning point in a small workshop comes long before the first tool is plugged in. It usually starts when you slow down, look around the room and think, “Alright… if I want this to work, I need to get the basics right.” That is where prepare a woodworking shop quietly becomes the anchor. It sounds simple, but anyone in a tight space knows it shapes everything that comes after.
I learned that the hard way in my own narrow garage. Cold floors, walls that ate dust, a metal roof that dripped on my lumber whenever the weather changed. Nothing dramatic, just the kind of small frustrations that pile up until you finally decide to fix them.
Maybe you are standing at that same point now. Floors you can stand on without freezing, walls that actually help instead of hinder, a climate that does not fight you. Think of it as the part of the setup that does not get much attention, but quietly determines how enjoyable your shop will feel day after day.
You can see this guide as the second step in building a real woodworking shop space.
If you want to revisit the first step, you can always jump back to choosing the perfect woodworking shop space.
If you ever want the bigger picture of how this fits into the full path, you can find that in my beginner workshop overview at Woodworking Shop for Beginners: Claim Your Space.

– Updated on
Key Takeaways
– You’ll learn how the workshop shell shapes comfort, stability and day to day workflow
– You’ll see why floors, walls and climate matter more than most beginners expect
– You’ll discover simple fixes that make a small shop feel brighter and easier to work in
– You’ll understand common mistakes so you can avoid the ones that quietly slow you down
– You’ll notice how small climate changes affect wood, tools and your overall build quality
Disclosure: At zero cost to you, I may get commissions for purchases made through links in this post. I earn from qualifying purchases as an Amazon associate. Products featured are selected based on quality, performance, and reputation, regardless of affiliate relationships.

Table of Contents
What the workshop shell means when you prepare a woodworking shop
When you start to prepare a woodworking shop, it helps to slow down for a second and look at the room as a whole. Most of this stage comes down to three easy steps or areas that shape how a shop feels day after day: the floor, the walls and the climate that keeps everything steady.
The workshop shell is simply the physical environment you work in. The floor you stand on, the walls that surround you, the temperature that shifts through the seasons, even the quiet ways moisture moves through the air. It is all the stuff that feels invisible until it suddenly isn’t.
Why beginners skip this step
A lot of beginners move straight to tools and forget these workshop preparation basics. I get it. It feels more exciting to unbox a new saw than to think about cold concrete or the way humidity settles overnight.
Some common things that get overlooked:
- Assuming the floor does not matter because “it’s just concrete”
- Ignoring how rough walls collect dust and kill your light
- Forgetting that small spaces react strongly to temperature swings
- Not noticing early signs of moisture until the first tool starts to rust
I learned parts of this the hard way. On warm days after cold nights, the metal roof in my garage used to sweat. Drops would fall on my lumber and leave clear marks. Add cold feet on a bare floor and you start to feel how comfort and climate shape your workflow long before tools ever do. Maybe that is why woodshop climate control often shows up in searches for small shops. People feel something is off but cannot name it yet.
How this step affects everything later on
A good shell makes later decisions feel smoother. A bad shell quietly slows everything down. You can lay out the perfect workflow on paper, but if the room itself fights you, nothing behaves predictably. Cuts feel rushed, glue dries too fast or too slow, and tools shift in accuracy because the air never stays consistent.
A small table like this can help visual thinkers:
| Weak workshop shell | Effect on your work |
|---|---|
| Floor stays cold or uneven | Fatigue, slipping, harder to keep steady pressure |
| Walls absorb or block light | Poor visibility, more mistakes |
| Temperature swings | Glue failure, wood movement, warping |
| Moisture in the air | Rust on tools, swelling in MDF, unstable joints |
These things are subtle at first. You only really notice them once you start building regularly. But once you fix the shell, everything else settles down. It becomes the quiet support system that lets the rest of your workshop make sense.
Step 1: Get your workshop floor ready

When you start to prepare a woodworking shop, the floor is usually the first place where reality shows up. Mine was bare concrete with a few rough spots, nothing dramatic, but cold enough that my feet would stiffen on winter mornings. I used to shift my weight every few minutes just to keep some circulation.
After a couple of hours of standing still, I could feel the fatigue slowly creeping in. It reminded me that a floor is not just something you stand on. It shapes how long you can work, how steady you feel and how much attention you have left for real woodworking.
What a beginner should understand about floors
A workshop floor does more than people think. It influences comfort, safety and even how clean your space stays over time. Good woodshop flooring supports your body and keeps you steady when you push a tool through a cut. A bad one makes everything feel slightly harder.
Some things that matter:
- Comfort when you stand for long stretches
- Stability under pressure
- How easily dust builds up or stays trapped
- How safe the surface feels when your focus is somewhere else
Even small changes here can make the whole room feel more inviting.
Types of floors you find in small workshops
Most small spaces fall into one of three categories. Each has its own strengths and limits. A simple overview helps beginners see what they are working with.
| Floor type | Pros | Cons |
|---|---|---|
| Concrete | Stable, durable, tool friendly | Cold, hard on joints, slippery when dusty |
| Plywood | Warmer, easier on the body, quick to install | Can flex, sensitive to moisture |
| Floor mats | Great comfort, absorbs vibrations | Can shift, not ideal under heavy machines |
You do not need a perfect floor to get started. You just need to know what yours gives you and what it takes away.
When rubber mats become useful
Rubber mats are one of those upgrades you do not fully appreciate until you try them. I worked once in a shop that had them across the main work zone, and the difference was immediate. Softer underfoot, more grip, less fatigue. It felt like a quiet way to improve your workshop space without tearing anything apart.
You do not need to cover the whole room either. One mat in front of your bench or saw already changes how a long session feels.
Common mistakes with workshop floors
Beginners often run into the same issues. Keeping them in mind helps you avoid small frustrations later.
Some easy mistakes to watch for:
- Treating the floor as an afterthought
- Ignoring how cold concrete drains your energy
- Putting mats in the wrong places
- Forgetting how dust builds up on smooth surfaces
- Overestimating how much moisture plywood can handle
- Choosing the wrong coatings or skipping them entirely
If you want to dive deeper into specific solutions, the Flooring Overview of All Types guide breaks down each option in more detail.
Step 2: Get your workshop walls ready
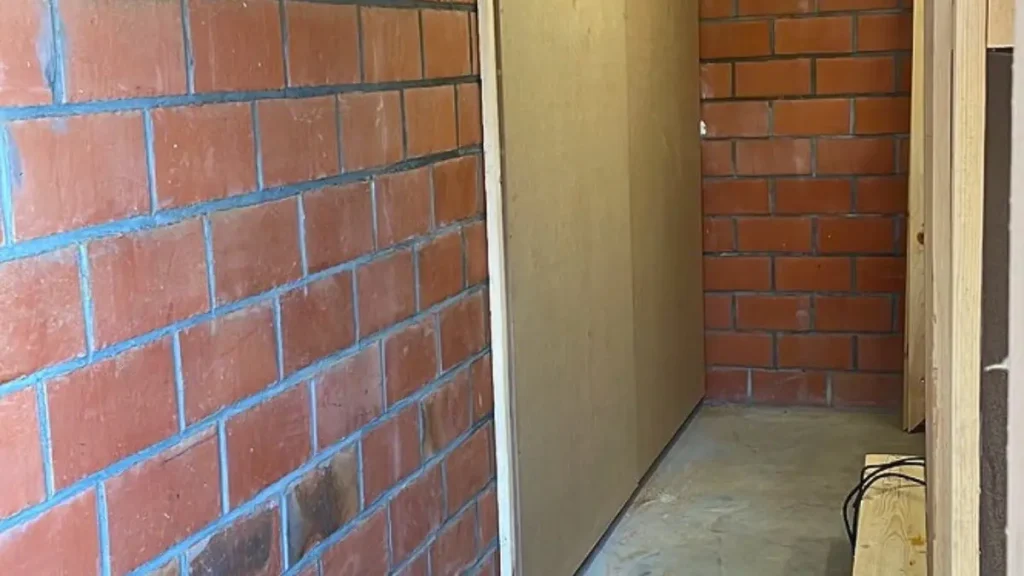
Once the floor feels sorted, the walls are usually the next part of the room that quietly asks for attention. In the beginning, I underestimated mine. They were red hollow clay blocks, rough enough to hold dust and dull enough to swallow light. I also used the wrong type of plugs at first, which meant some things simply would not stay in place. One of the first shelves I hung started to sag within days.
It took a bit of trial and error before I realized how much cleaner, brighter and more useful a workspace becomes when the workshop walls actually support what you do.
Why walls are often a missed opportunity for beginners
For many beginners, walls are just the background. But in a small shop, they do a lot more than set the mood. They control how light bounces around, how much dust sticks to the surface and how safe it feels to reach for tools. They even shape the storage you can build without fighting the structure underneath.
Some things walls quietly influence:
- How evenly your space is lit
- How easy it is to keep things clean
- How secure your shelves or cleats feel
- How much usable storage you can add without clutter
A little attention here goes a long way.
Materials that can improve your walls
There are a few common workshop wall material options, each with their own personality. Some are sturdier, some brighter, some more forgiving when you change your mind every few weeks.
| Material | Pros | Cons |
|---|---|---|
| MDF | Smooth, paint friendly, easy to screw into when backed properly | Sensitive to moisture, heavy panels |
| OSB | Strong, rustic look, good for hanging storage | Rough surface, not great for light reflection |
| Plywood | Balanced strength and weight, cleaner finish | Pricier, can splinter at edges |
You do not need a fancy solution. You just need something that works with your space instead of against it.
How I built my own walls
In my small 3 by 6 meter garage, I wanted something clean, light and practical. I built a thin wooden grid against the hollow clay blocks, using the lightest strips I could find. Space matters in a narrow shop, and even two extra centimeters can change how freely you move.
On top of the grid, I mounted 12 mm MDF panels and painted them white. It made a bigger difference than I expected. The walls reflected light instead of eating it, and I could screw things in wherever I needed without peppering the original wall with holes. After struggling with the wrong plugs early on, the simplicity of this system felt like a small win.
Maybe that is the real value of good walls. They turn the vague shape of a room into a workspace that actually helps you think.
Common mistakes with workshop walls
A few small missteps tend to show up over and over. None of them are dramatic, but they slow things down in ways you only notice later.
Common issues include:
- Using the wrong plugs in hollow walls
- Adding a front wall that is thicker than needed
- Ignoring how much light the surface absorbs
- Forgetting to seal or paint materials that collect dust
- Overloading weak spots without checking the structure
If you want to go deeper, the Wall Improvements guide (under construction) breaks down practical solutions step by step.
Step 3: Get your workshop climate under control

Climate is one of those things you barely notice until it starts slowing you down. In a small shop, everything reacts quicker. Warm days feel warmer, cold days feel sharper and moisture finds its way into corners you did not expect.
When I began to prepare a woodworking shop in my own 3 by 6 meter garage, I thought climate control would be something to worry about later. It only took one season of roof condens dripping onto my boards to realize it needed attention much sooner. Maybe that is why people keep searching for woodshop climate control even when they are still at the beginner stage. The room teaches you, whether you are listening or not.
Why climate control matters in small spaces
A small workshop shifts temperature faster than a large one. Warm air rises, cold surfaces stay cold, and humidity collects in places you never planned for. In a narrow room like mine, you feel these changes almost immediately. It affects comfort, of course, but also accuracy, stability and how predictable your materials behave.
A few things beginners usually overlook:
- Small rooms swing more drastically with weather
- Moisture builds up faster when air cannot circulate
- Temperature changes make tools and materials react differently
- Even mild discomfort distracts you more than you expect
Climate is part of the workshop shell itself, not an extra.
Temperature problems and how they affect your work
Temperature alone can change the way your projects behave. I had it happen while glueing a large tabletop made from narrow strips. It was about 90 by 210 centimeters. I used enough glue that I thought I had plenty of time, yet the heat in the shop made it start curing before the clamps were even in place. I remember looking at the clamps thinking I still had time, and then realizing the glue had already skinned over. It was a frustrating lesson, but one that sticks.
Things that show up when temperature is off:
- Glue curing too fast or too slow
- Metal tools feeling cold enough to affect control
- Working time reduced by heat
- Fatigue from cold or warm air pockets
A workshop is a physical environment. Temperature keeps reminding you of that.
Tip: if glue starts setting faster than expected, cool the room down for ten minutes before you start a bigger glue-up.
Understanding moisture and condensation
Moisture works quietly. You often see the results before you notice the cause. When my roof was still uninsulated, cold nights after warm days created condensation on the metal. That moisture collected, then dropped straight onto my lumber. You could even hear a faint ticking sound as droplets formed on the metal roof and fell onto the floor and the wood in my shop. The damage was immediate and obvious. I also had tools showing early signs of rust before I understood what was happening.
What moisture can do:
- Wood swells, bends or loses stability
- MDF reacts even quicker and can warp overnight
- Tools show rust spots earlier than expected
- Stored boards take on uneven moisture and move unpredictably
I do not think most beginners realize how quickly this can happen in a tight space.
Simple solutions for beginners
You do not need an advanced system to manage climate. A few small adjustments can change the rhythm of your shop more than you would think.
Some beginner friendly steps:
- Add insulation to the roof to prevent condensation, that is what I did
- Improve airflow by creating a simple circulation path
- Keep the garage door slightly open when the weather allows
- Avoid trapping moisture behind shelves or panels
- Pay attention to how your workshop shell responds to weather changes
If you want to dive deeper into the details, the Humidity and Temperature guide (under construction) walks through the basics step by step.
A quick summary checklist for preparing your woodworking workshop
Sometimes it helps to pause and look at the room with fresh eyes. This short checklist keeps things simple so you can see what is already working and what still needs attention.
- Floor readiness: Is the surface safe, clean and comfortable enough for longer sessions
- Wall readiness: Are your walls helping with light, storage and easy access to tools
- Climate basics: Do temperature and humidity stay steady enough for glue, wood and tools
- Comfort: Can you move freely without cold spots, dark corners or cramped zones
- Ventilation: Is there a clear path for fresh air, even if it is just a small opening in the garage door
Small steps like these usually make the whole space feel calmer and easier to work in.
What to do next
It is easy to rush past this stage, but a steady workshop shell quietly supports everything you will build later. I still remember lying awake one night after seeing how roof condens had damaged a few boards, realizing that small things in the room could shape the whole workflow.
Maybe that is why these workshop preparation basics matter more than they first appear. When you are ready, the next step is simply measuring and mapping your space so it begins to feel like a shop that truly fits you.
Your next steps in the beginner workshop journey
Once you have defined your woodworking shop space, the next phase becomes much more manageable. You can follow the beginner path in small, steady steps:
- measure and map the room so you understand your movement paths in Measuring and Mapping Your Space (Under Construction)(the third step in building a real woodworking shop space).
- If you ever want the bigger picture of how this fits into the full path, you can find that in my beginner workshop overview at Woodworking Shop for Beginners
Each step builds on the one before it, and together they turn your chosen room into a workshop you can grow into with confidence.
Frequently Asked Questions
What does it mean to prepare a woodworking shop?
Preparing a shop means getting the floor, walls and climate ready so the space feels stable, comfortable and safe to work in.
Do I need to fix my workshop floor before buying tools?
It helps. A steady and comfortable floor makes long sessions easier and reduces small mistakes.
How important are workshop walls in a small shop?
Walls affect light, dust, storage and how easily you can organize tools. Improving them can make the whole space feel brighter and calmer.
Should I insulate my workshop if it is in a garage?
Insulation helps control temperature swings and prevents roof condensation from damaging wood and tools.
What is the easiest way to deal with cold concrete floors?
A simple rubber mat in front of your workbench usually makes the biggest difference with the least effort.
Why does moisture affect wood so quickly in small shops?
Small spaces warm and cool faster, which leads to more condensation and uneven humidity. Wood reacts to that right away.
What should I improve first in my workshop shell?
Start with comfort and stability. A good floor, decent light on the walls and basic climate control make all other upgrades easier.








Leave a Reply